Create a Novu account
Create a new account on Novu Cloud or sign in if you already have an account.
Add the Novu SDK into your backend
Our SDKs support most major programming languages, making it easy to get started. Is your preferred language missing? Reach out to us!
Configure environment variables
To start, set the
You can find your public and secret API keys in the Developer section of the Novu dashboard. Since this step is for backend integration, be sure to use the secret key.For security, always define your API key as an environment variable and avoid committing it to source control.
NOVU_API_KEY environment variable in your application.You can find your public and secret API keys in the Developer section of the Novu dashboard. Since this step is for backend integration, be sure to use the secret key.For security, always define your API key as an environment variable and avoid committing it to source control.
Build a workflow
Navigate through the toggles to create your first custom workflow.
Create a new workflow
Create a new workflow
Create a new workflow by clicking on the Create Workflow button in the workflows page.
- Give your workflow a name (e.g. “User Onboarding”).
- Workflow identifier will be generated automatically (e.g.
user-onboarding). - Add tags (optional) : Tags are a great way to classify and filter workflows for you, and your users.
- Add a description (optional) : Add a description to help you and your team understand the purpose of the workflow.
Add steps to your workflow
Add steps to your workflow
Every notification workflow starts with at least one channel step. To add a step, click the Plus button (+) in the Workflow Editor.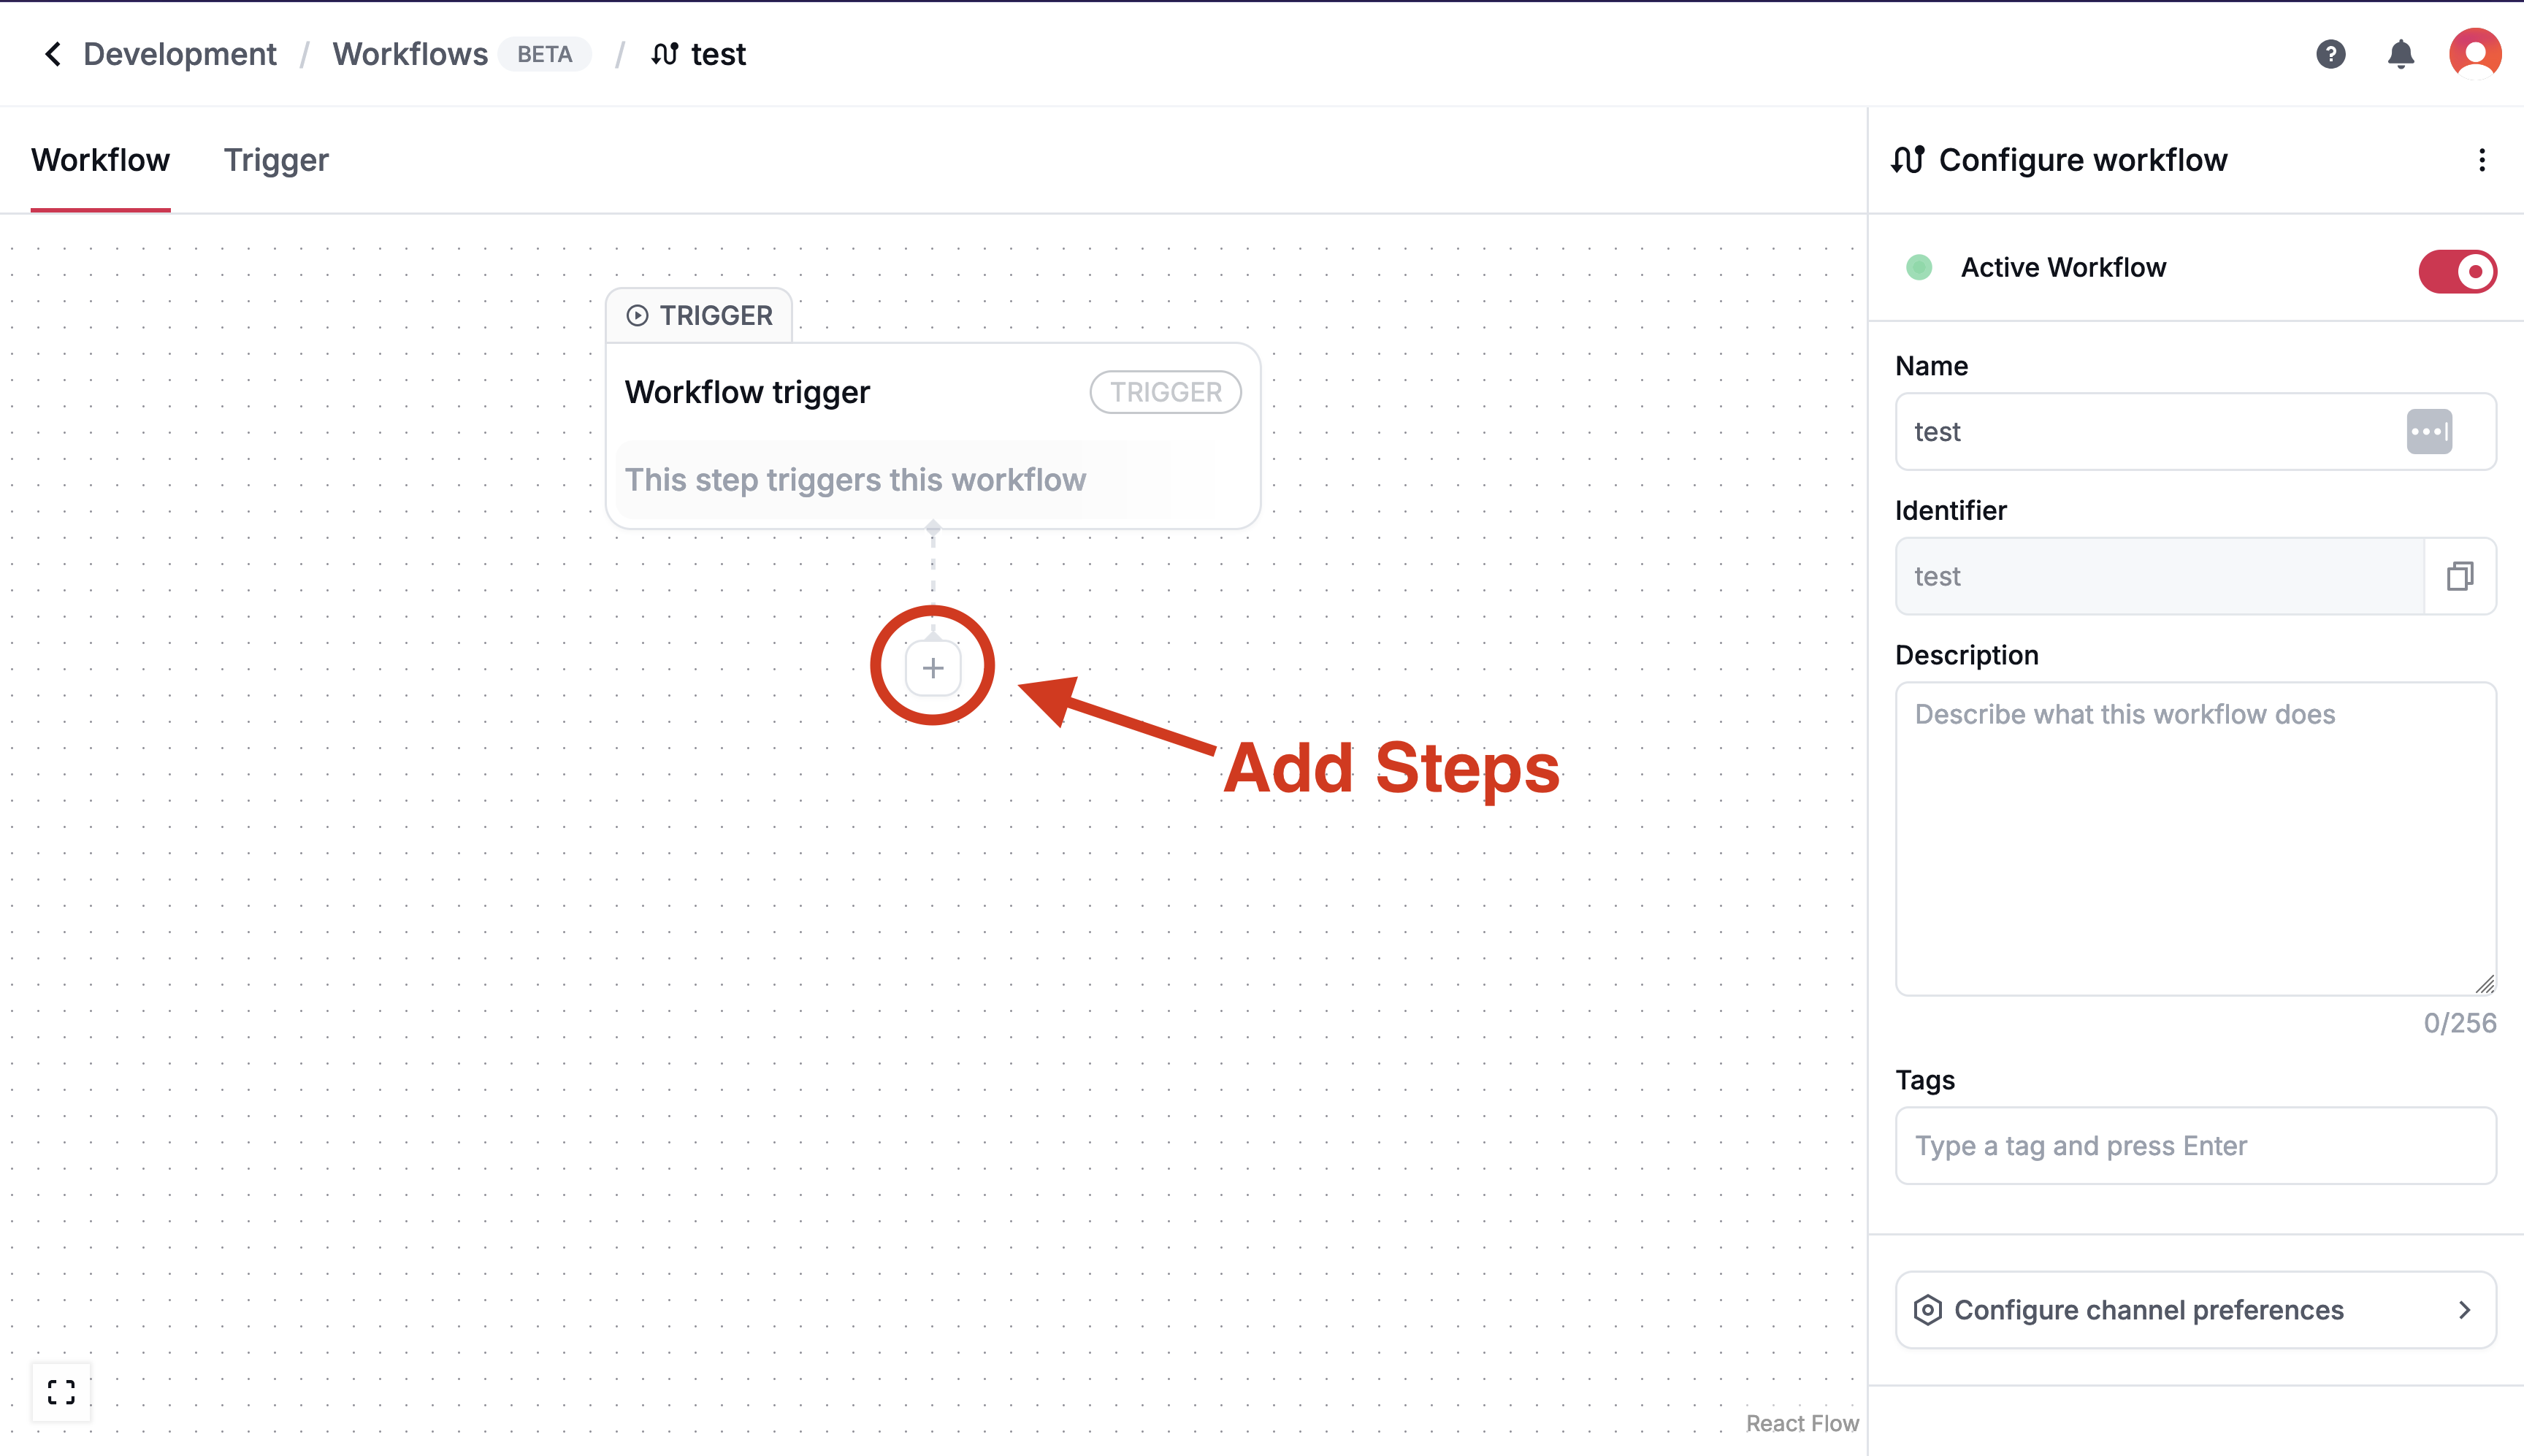 In the editor, you can customize your workflow with various steps, including Action steps (e.g., Digest and Delay) and delivery channels. Select a delivery channel to begin crafting your workflow.Workflows can include multiple steps, with each step sending a notification to the user. Steps execute in the order they are added.
In-app
In-app
In-app notifications are delivered directly inside your application via an Inbox or custom integration.Learn more about the In-App channel step
Email
Email is ideal for sending promotional or transactional messages.Learn more about the Email channel step
SMS
SMS
SMS excels at delivering OTPs, alerts, and two-factor authentication codes.Learn more about the SMS channel step
Push
Push
Web Push and Mobile Push notifications are perfect for time-sensitive updates.Learn more about the Push channel step
Chat
Chat
Chat notifications integrate with platforms like Slack, Microsoft Teams, WhatsApp, Telegram, and Discord.Learn more about the Chat channel step
Delay
Delay
Delay steps allow you to pause for a specified time before proceeding to the next step.Learn more about the Delay action step
Digest
Digest
Digest steps group notifications and send them later based on defined logic.Learn more about the Digest action step
Custom
Custom
Custom steps enable you to add tailored logic to your workflow using the Novu Framework.Learn more about the Custom action step
Design the notification templates
Design the notification templates
Once you’ve added a channel step, you can customize the notification content.Click “Configure Channel Step Template” in the channel’s edit view to open the Notification Template Editor and start editing.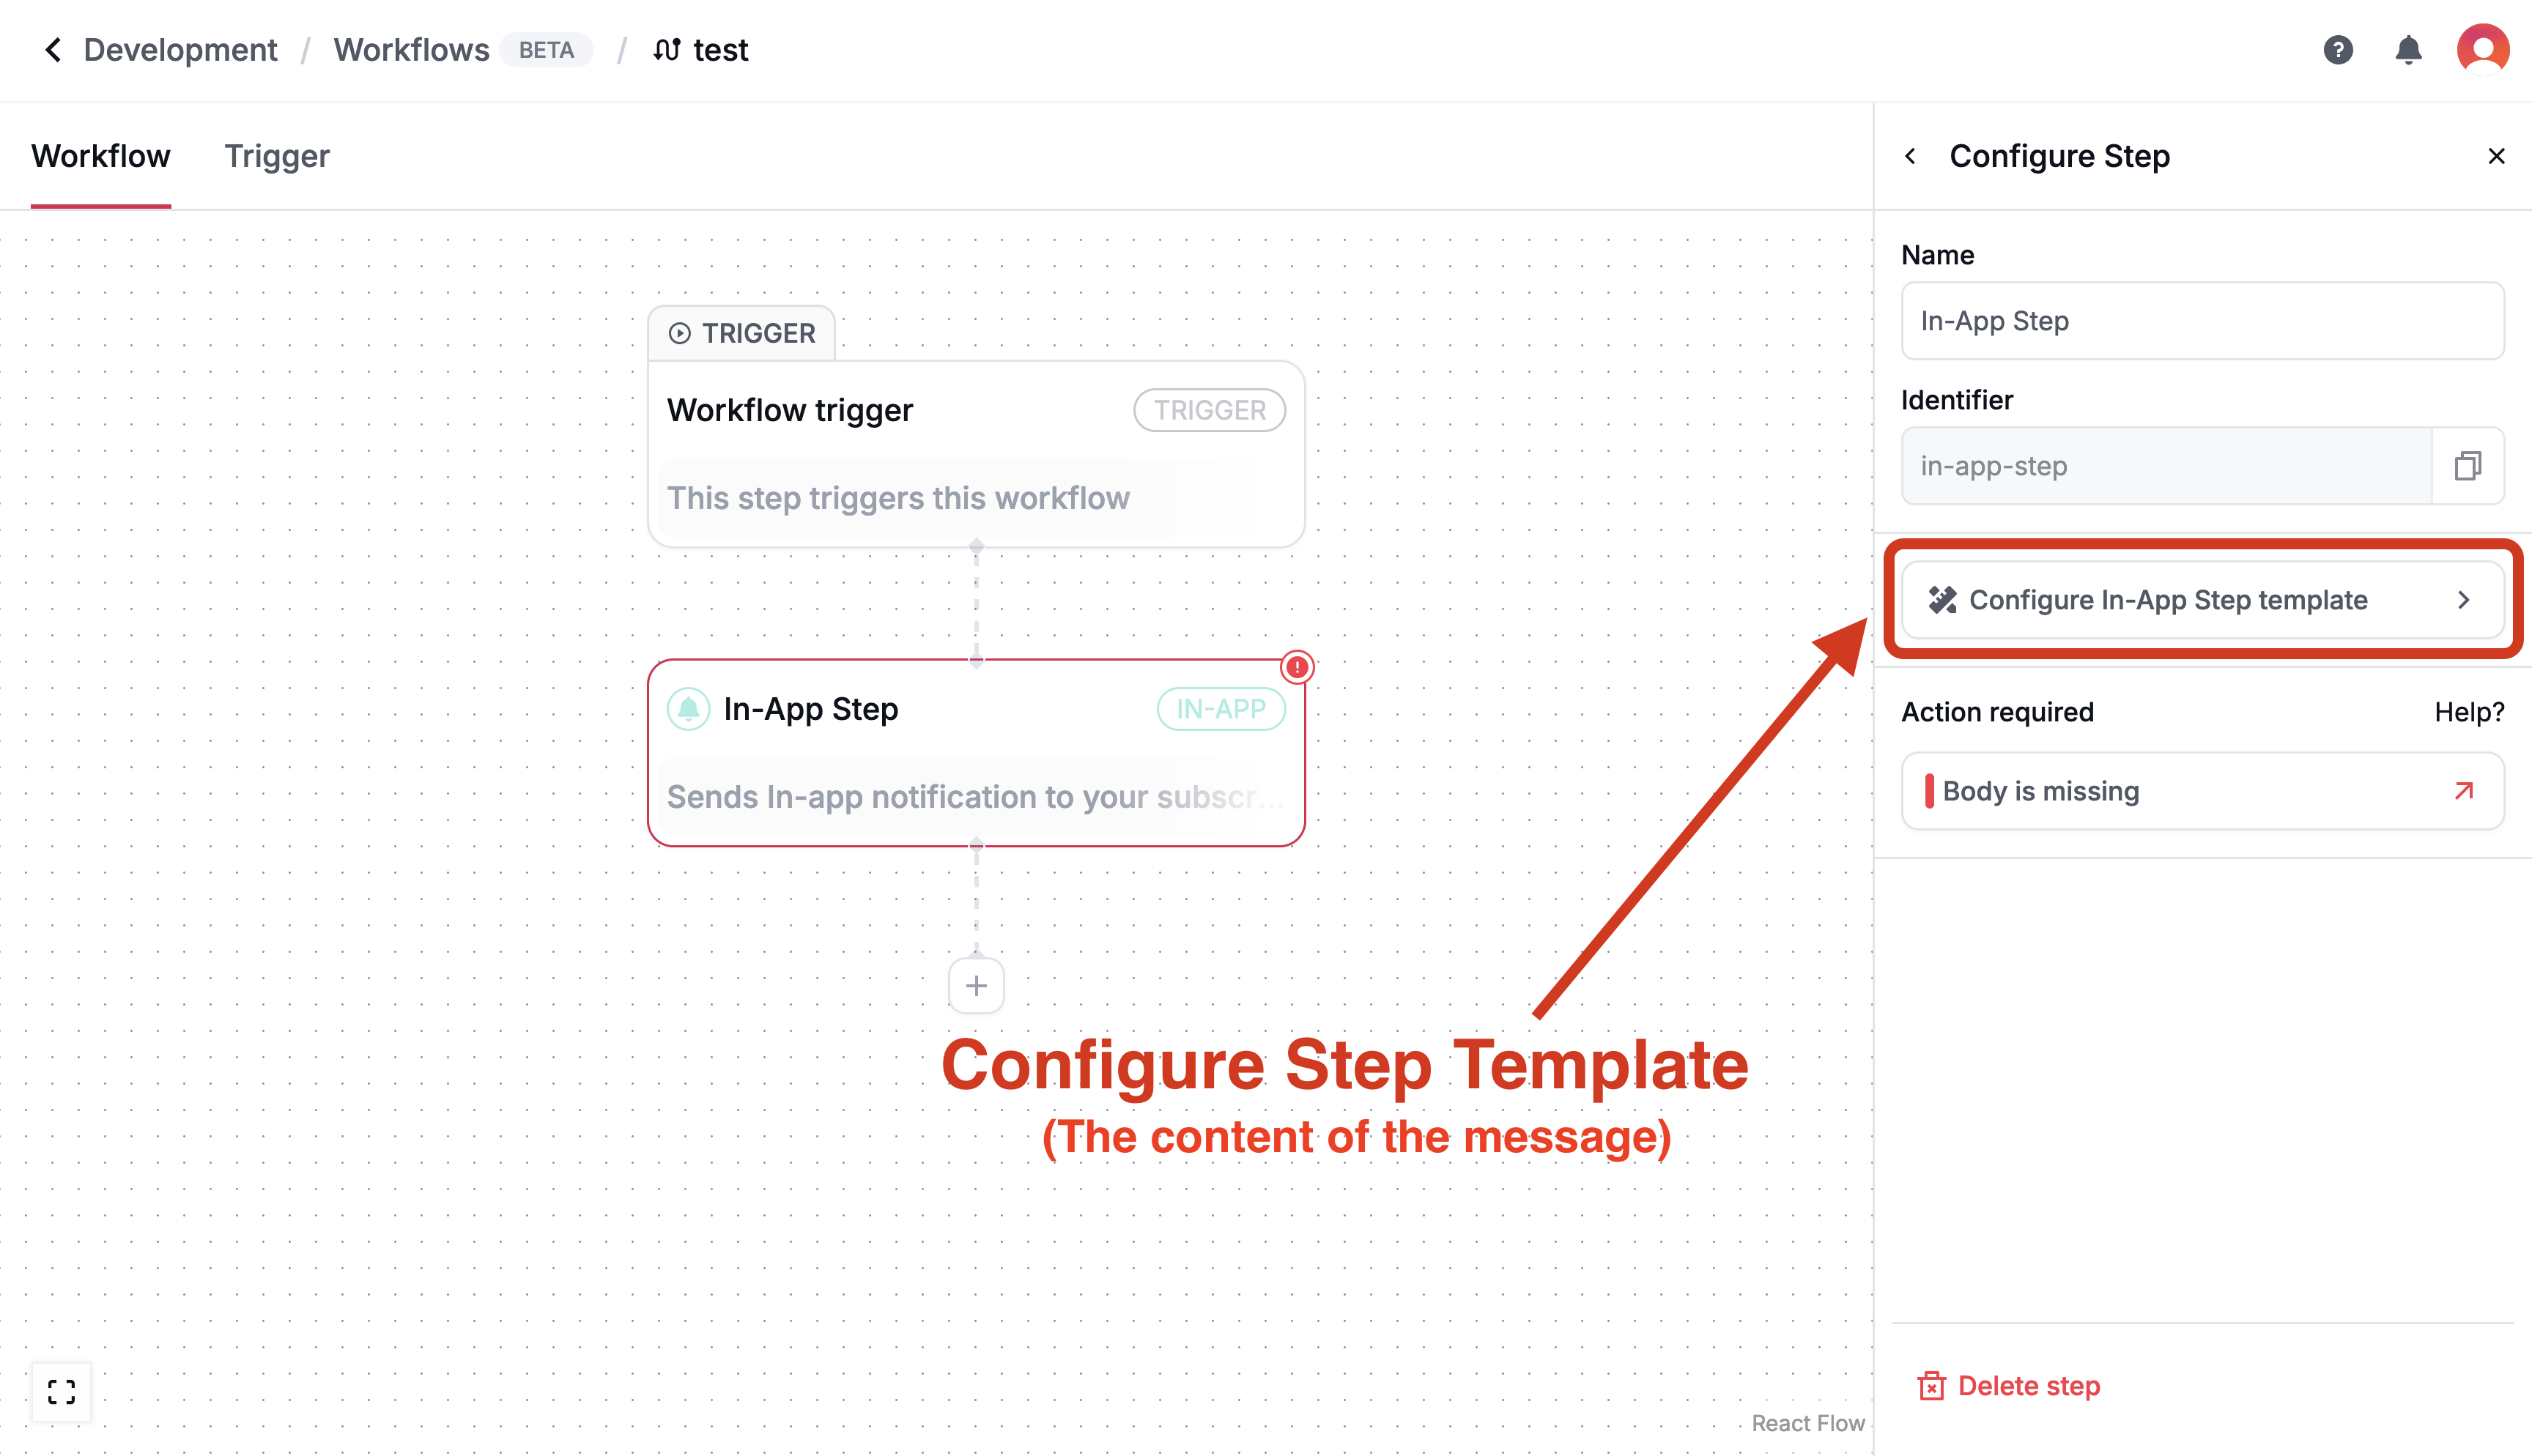 Each channel has its own template editor, allowing you to customize the notification content for each channel based on the channel’s capabilities.In this example, we’re using the In-App channel step, so we’re using the In-App template editor.
Preview your notification
Preview your notification
Preview your notification by clicking the Preview button in the Configure Template section of the workflow editor.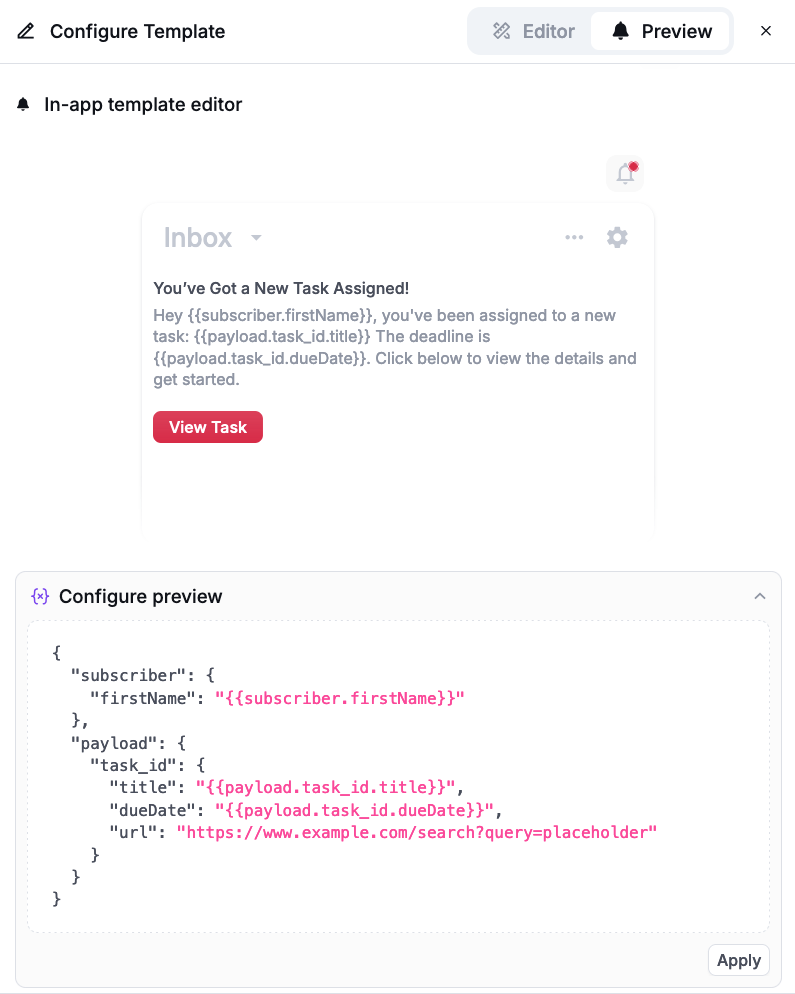
Test your workflow in the editor
Test your workflow in the editor
You can test your workflow in the editor by clicking the Test Workflow button in the workflow editor.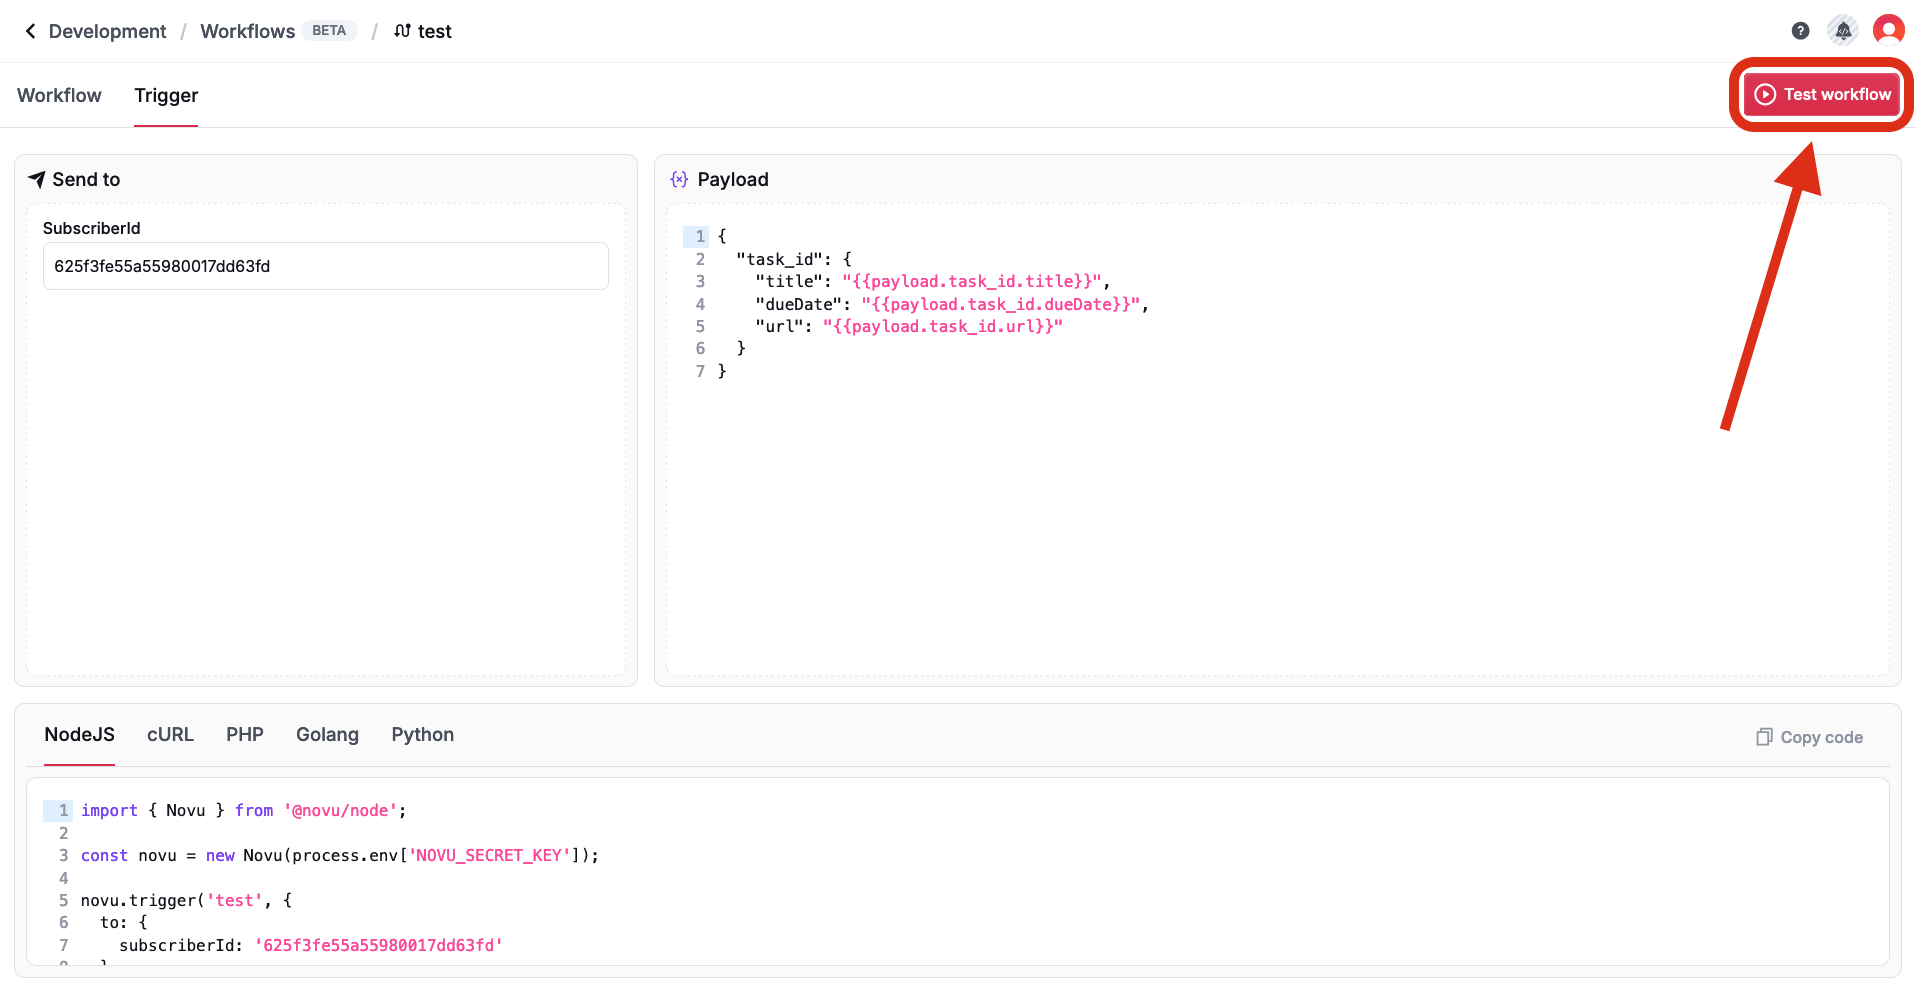
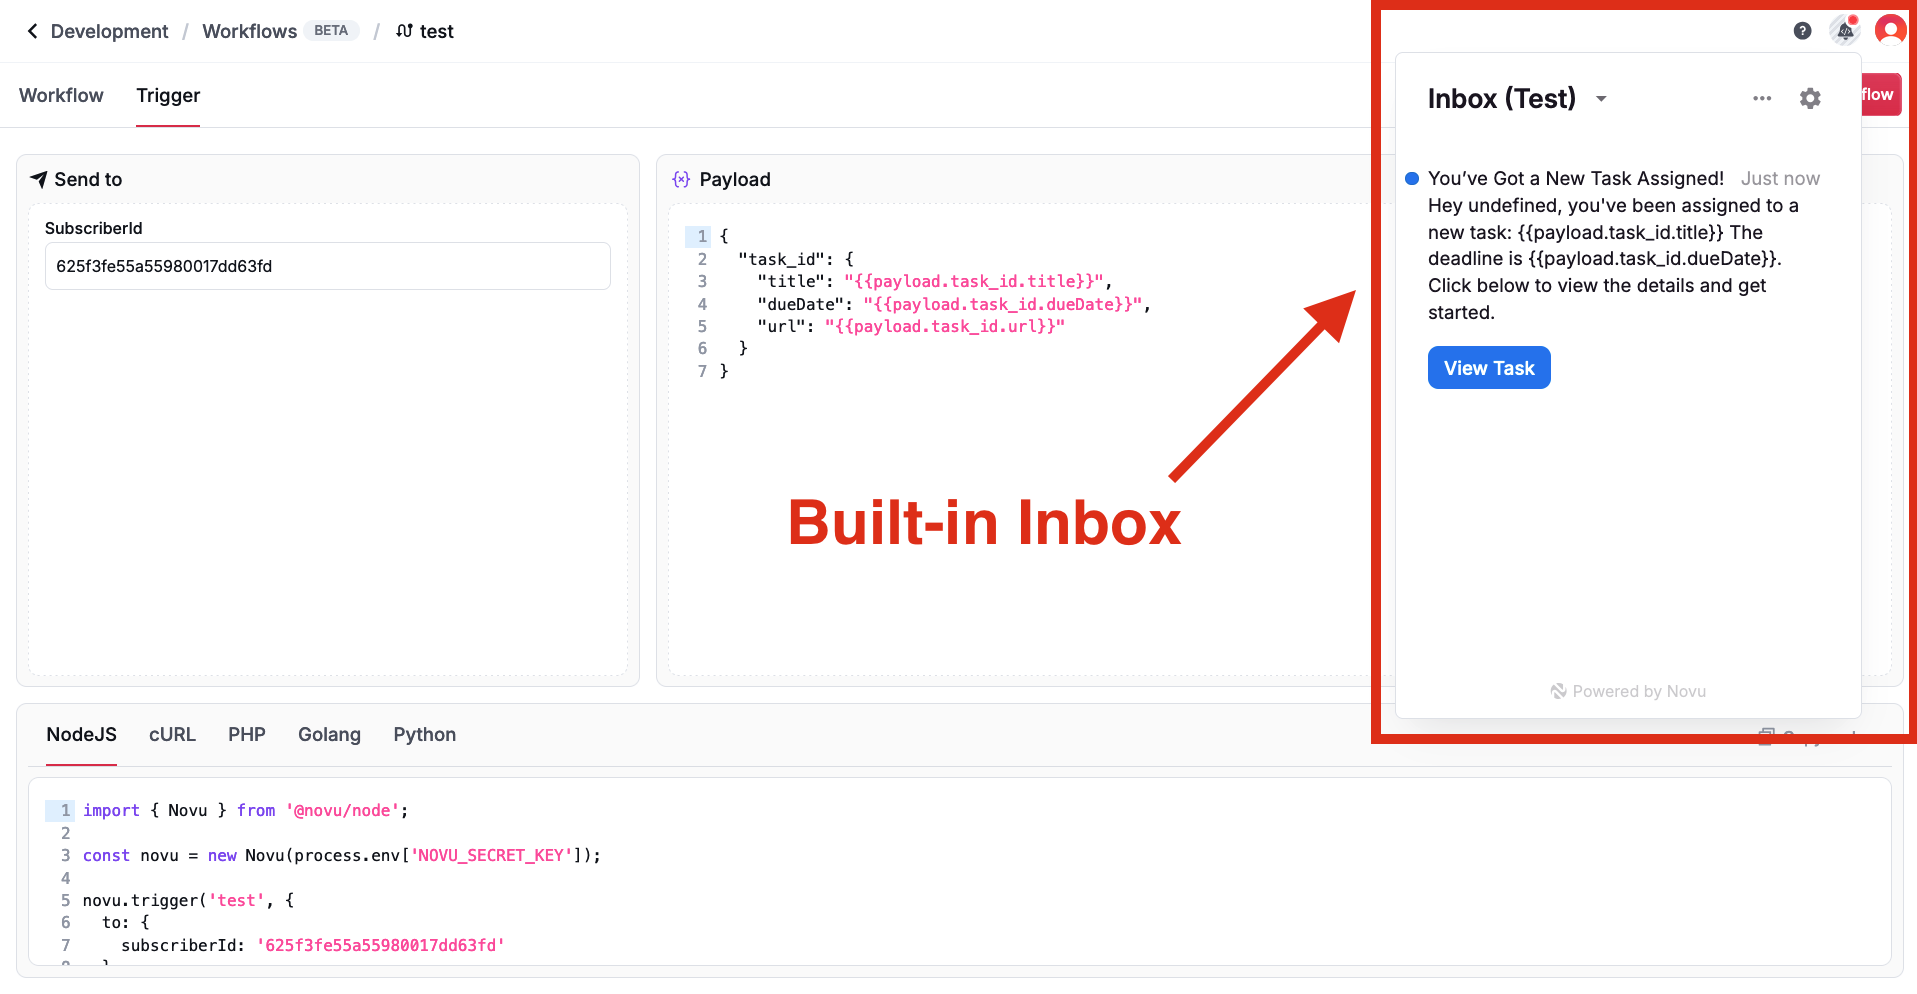
If you have the In-app channel step in your workflow, you can test your workflow in the editor with the default subscriber_id, you will see the notification in the Inbox section of the Novu dashboard.
Copy the sample payload
Copy the sample payload
Before leaving the Workflow Editor and heading back to your backend, navigate to the 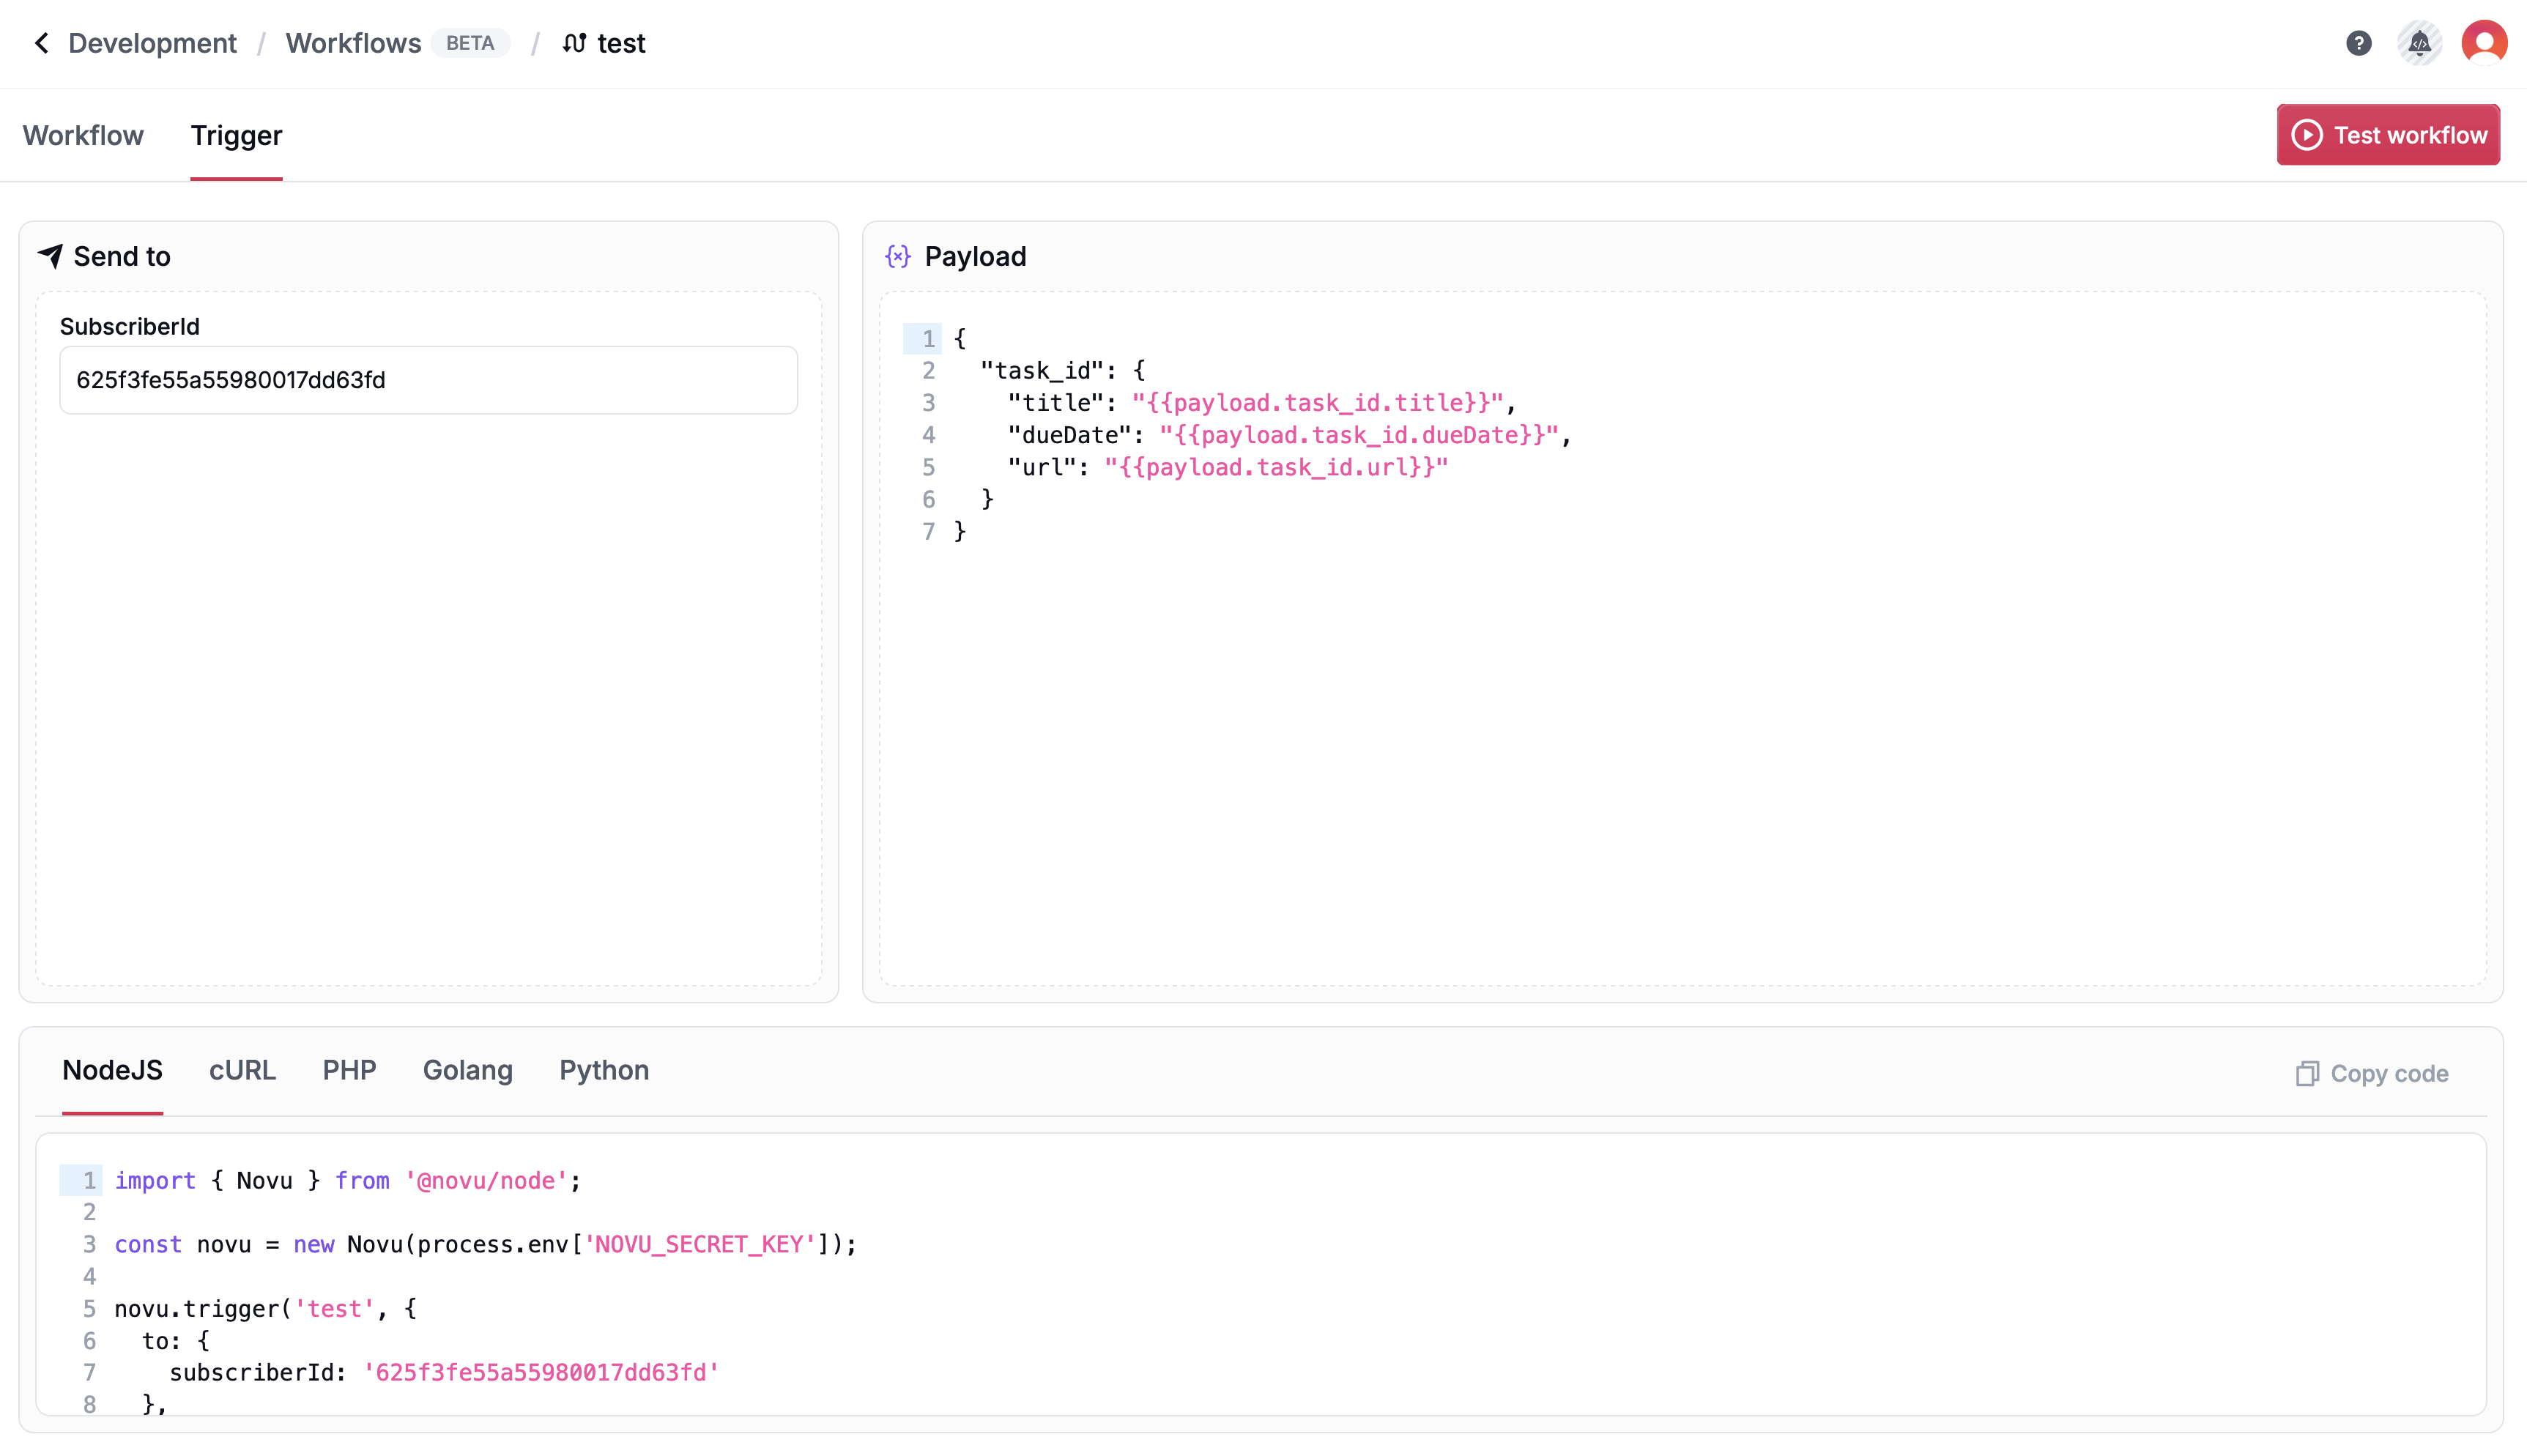 Based on the workflow we created, the sample payload will look like this:At the bottom of the page, you can grab the workflow trigger snippet and add it to your backend.
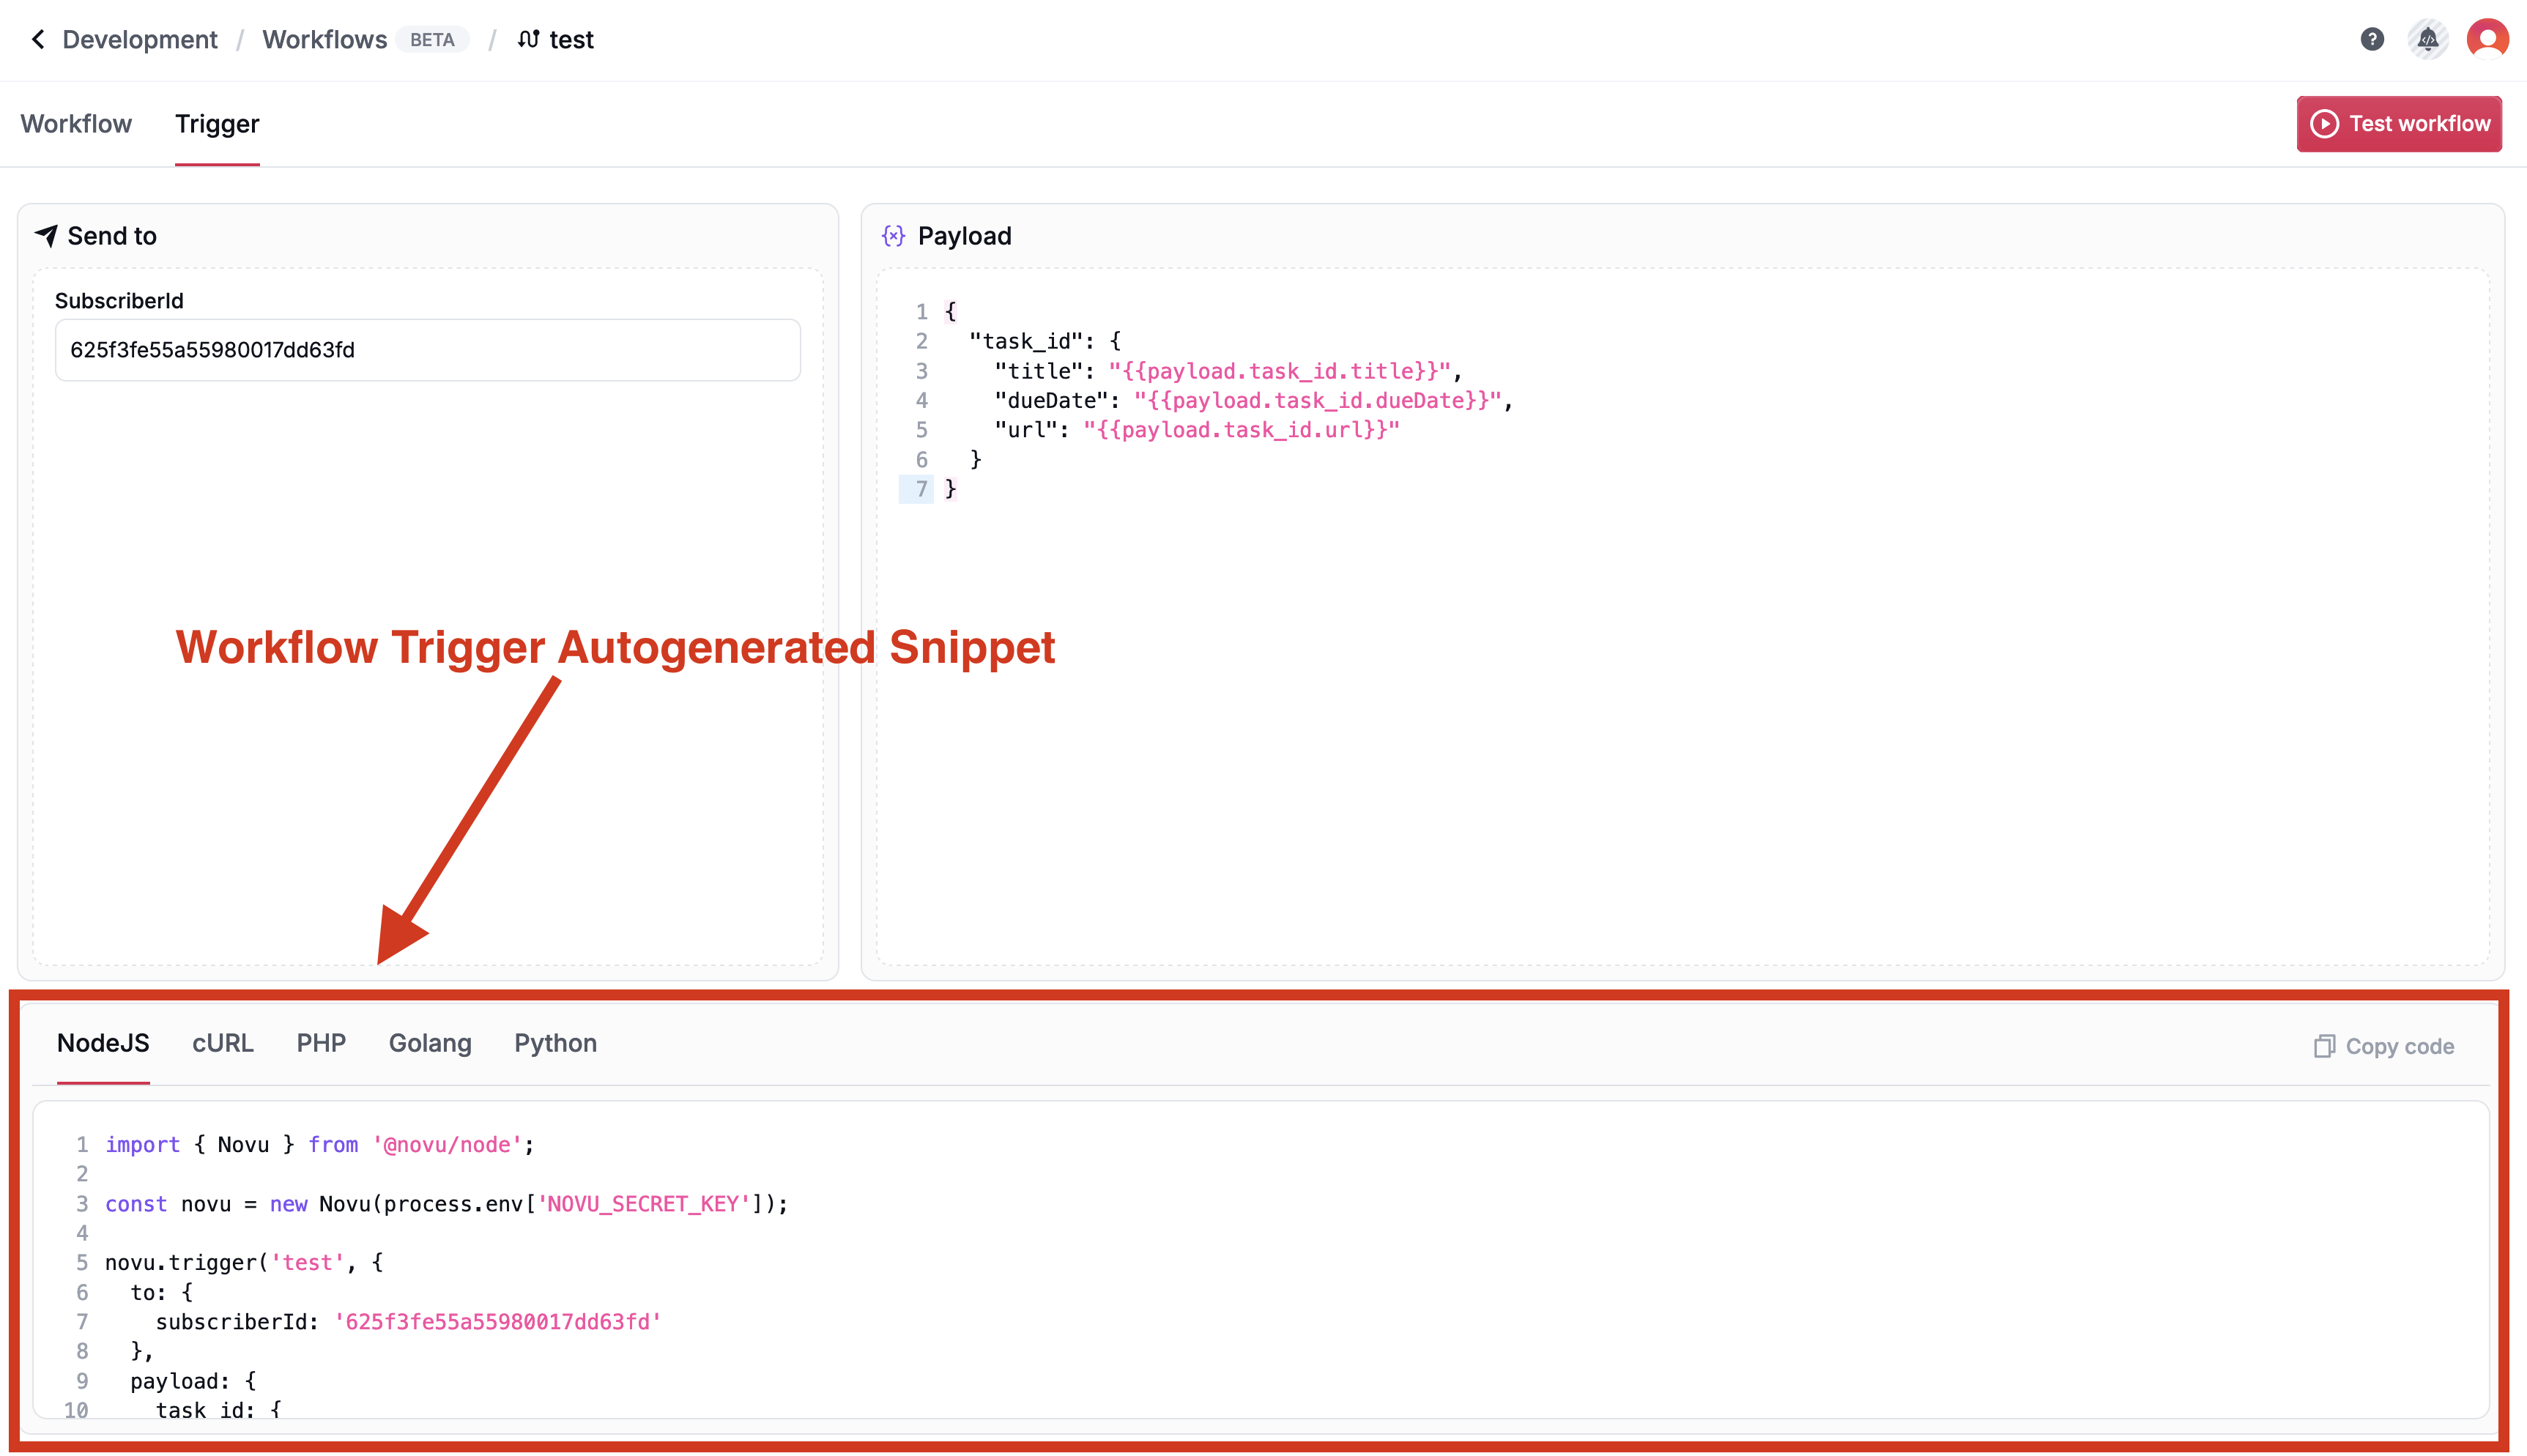 Now we’re ready to trigger our workflow via the Novu API.Learn more about how to build workflows
Trigger tab.Here, you can grab a sample payload to use when calling Novu’s API.Trigger the workflow
Each workflow is created with a unique identifier that can be used to trigger the workflow, visit the Trigger page to view the trigger instructions.In this example, we’re using the Node.js SDK to trigger the workflow. But the same can be done with any of the SDKs.Add the trigger snippet to your backend and call the trigger function with the Workflow identifier, Subscriber ID and Payload.Execute the trigger call from your backend.
Each trigger consists of 3 main parts:
- Workflow identifier: The unique identifier of the workflow to trigger.
- Subscriber ID: The unique identifier of the subscriber to trigger the workflow for, this can be a user id, email or any unique identifier.
- Payload: The payload to pass to the workflow, this is optional and can be used to pass additional information to the workflow.
If you have the In-app channel step in your workflow, you should see the notification in the Inbox section of the Novu dashboard.
Promote to production
Novu users logically separated environments to control the roll-out of your notifications. When you’re happy with the way your workflows work and look, you just need to promote them to production to start sending notifications to your real users.
 You should see a success message and the workflow will be synced to production.
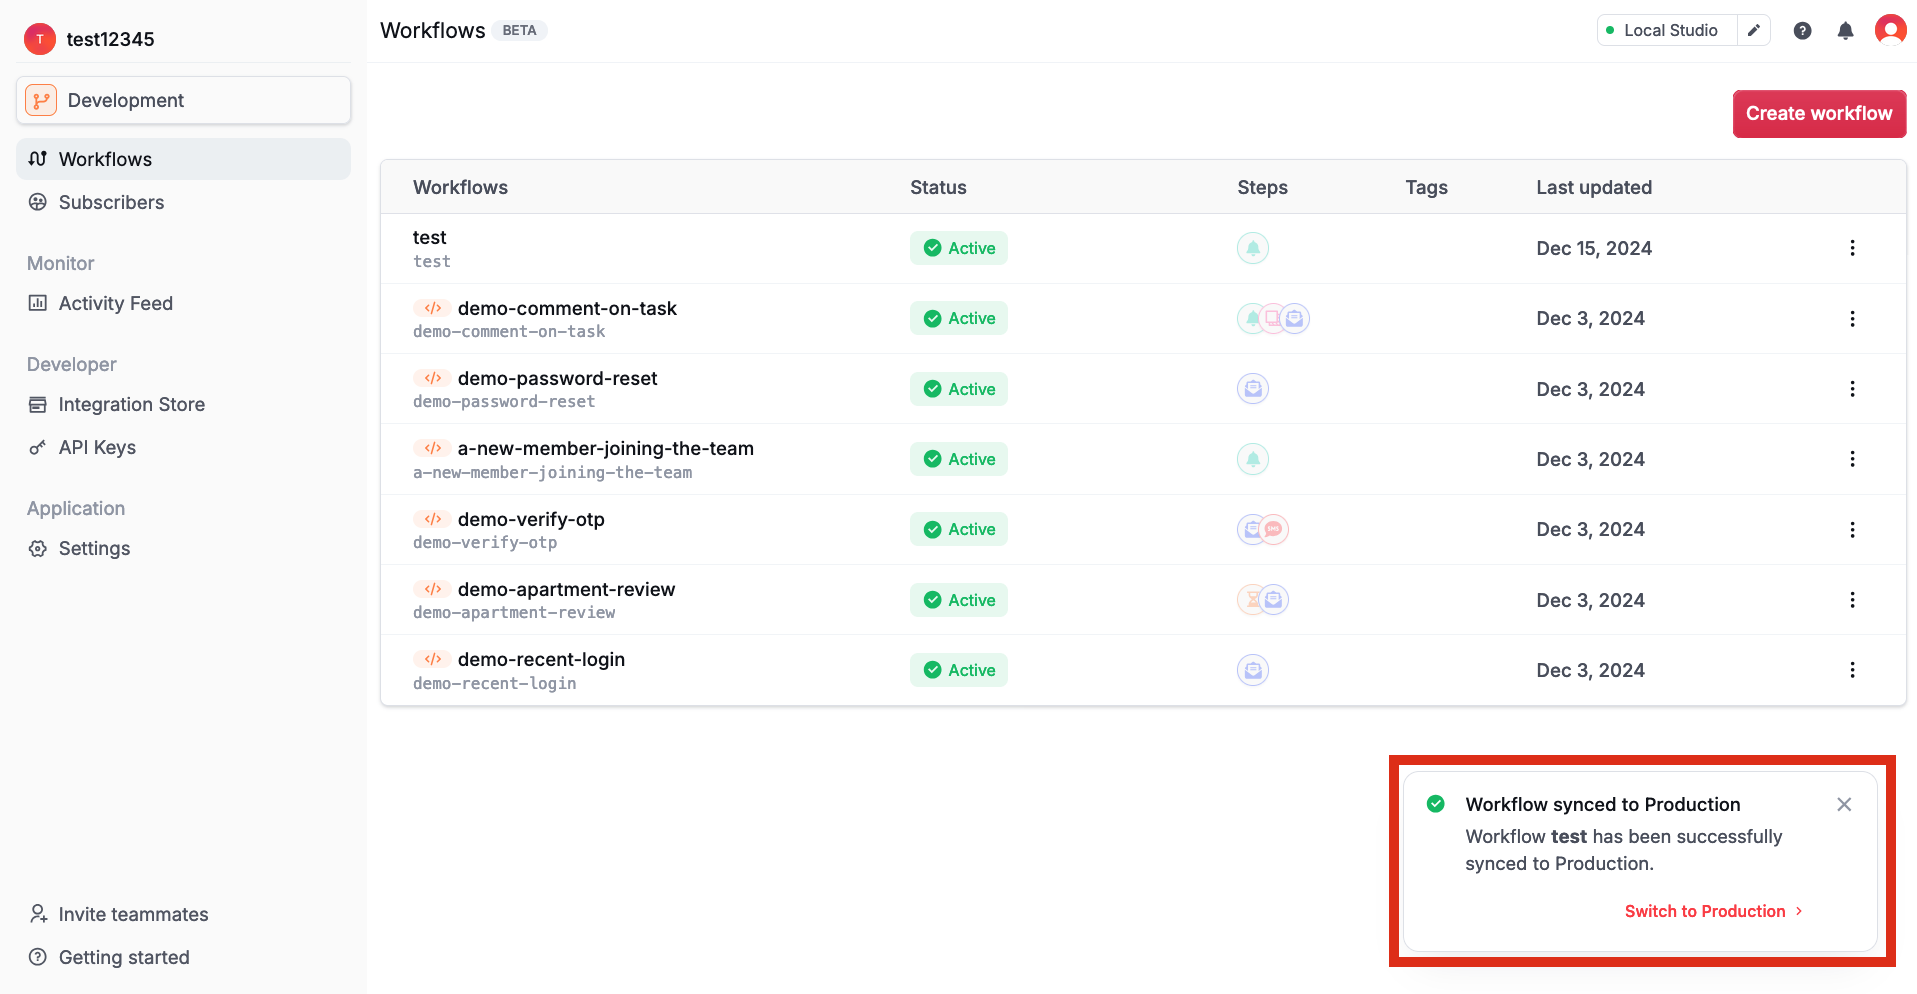
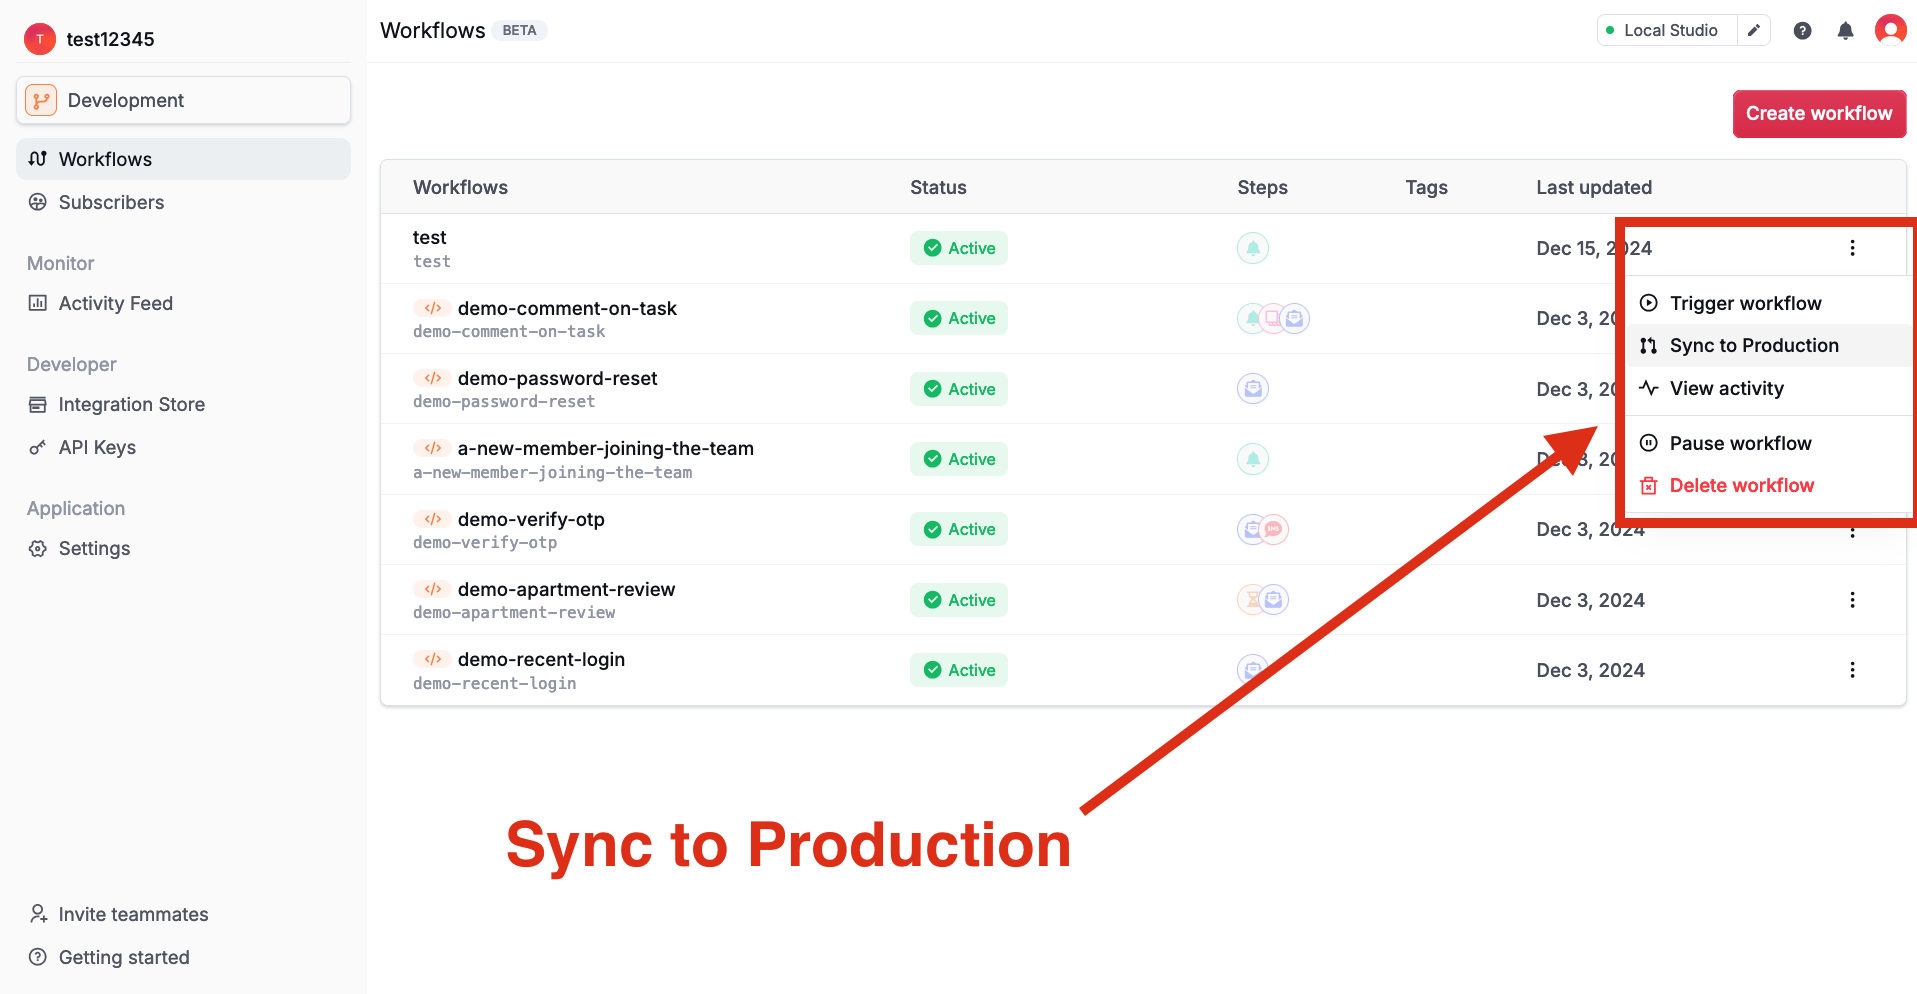
Sync your workflows
Sync your workflows
- Navigate to the Workflows page, click on the 3 dots button on the right side of the workflow you want to promote and click the Sync to Production button.
Switch to the production environment
Switch to the production environment
At the top of the page, you should see a dropdown to switch from the Development to the production environment.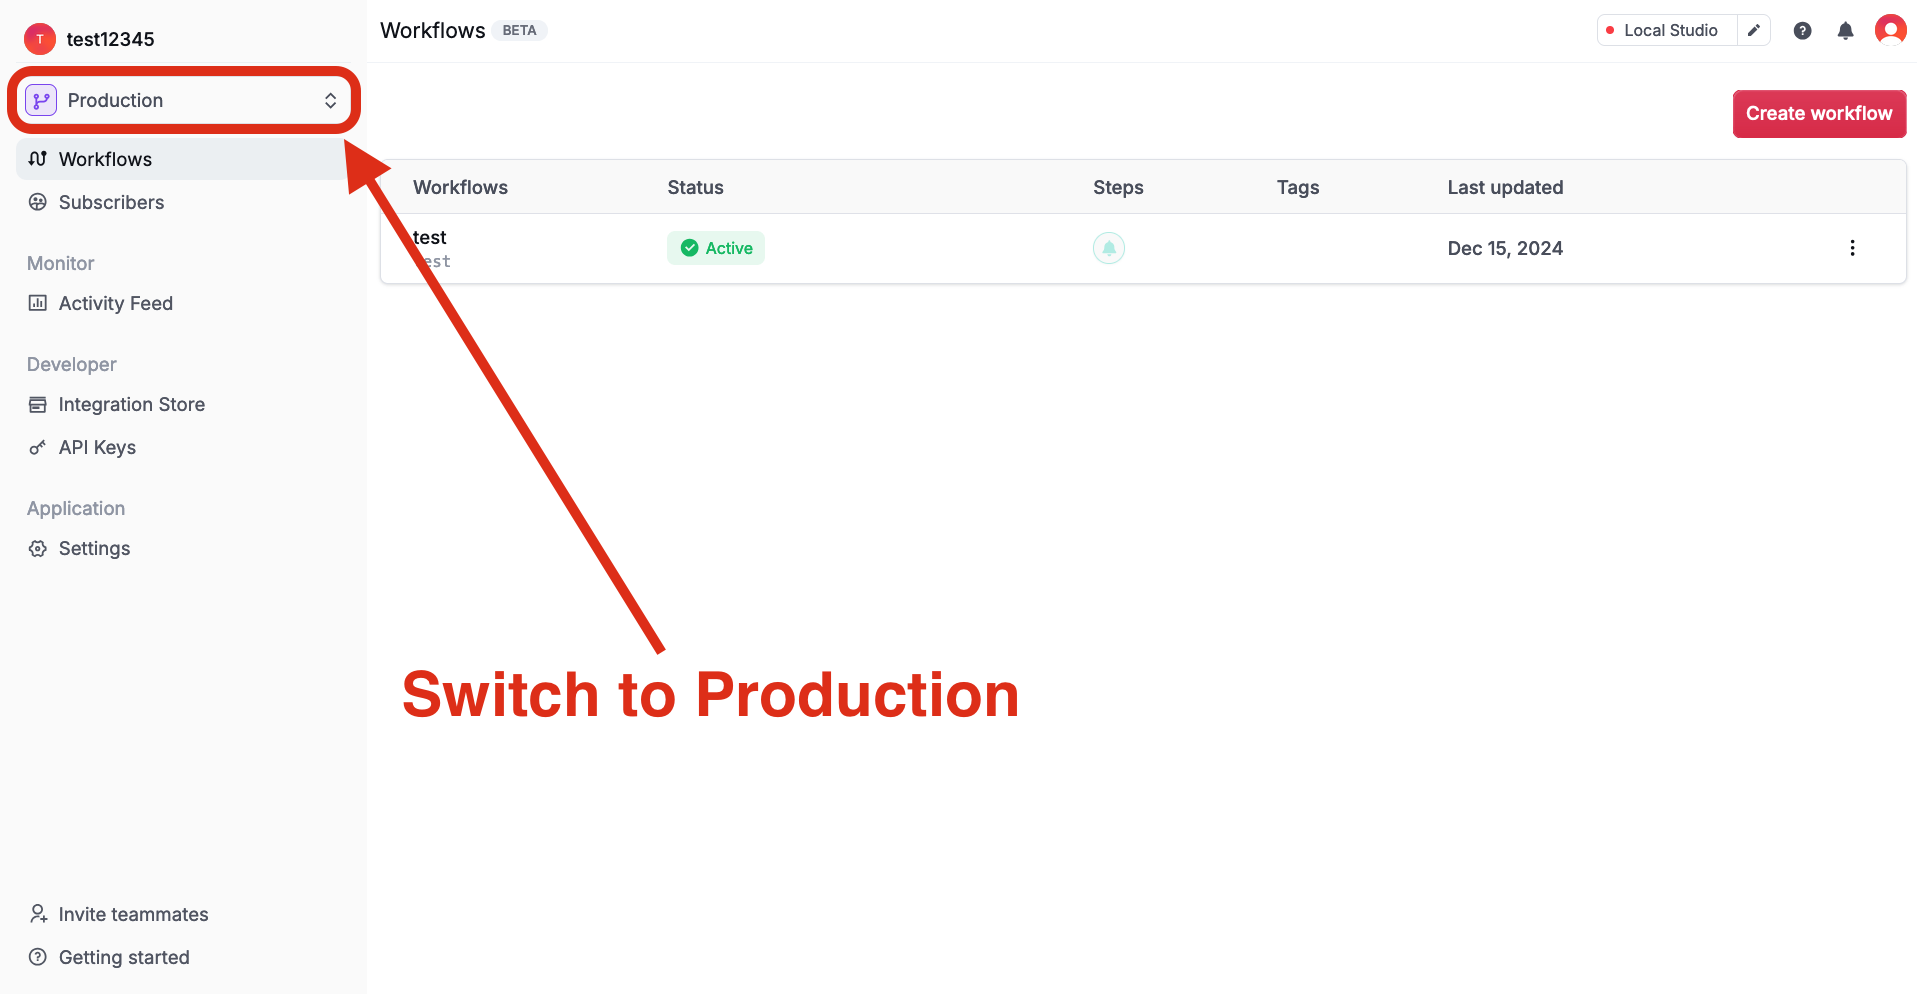 Once you have switched to the Production environment, you should see the workflows you have synced to production.
You are also able to test your workflows in the Production environment by clicking the Test Workflow button in the workflow editor.
Update your API keys
Update your API keys
Be sure to update your application’s environment variables to point to your Novu Production environment API Secret Keys.
You can find your Secret Keys in the Developer section of the Novu dashboard.
Update your Application Identifier
Update your Application Identifier
If you are using the in-app channel, you need to update your Application Identifier to point to your Novu Production environment Application Identifier.
You can find your Application Identifier in the Developers section of the Novu dashboard.
Join the community
If you have any questions or run into issues as you build with our product, we hope you’ll let us know! Email us at support@novu.co, or join our Discord community and we’ll be more than happy to assist you.
Inbox and preferences UI components
Explore our full-stack UI components libraries for building in-app notifications.
Novu Framework
Extend Novu Workflows with code, and accomplish literally any advanced use case imaginable.
Framework SDK
For more advanced use cases, use our SDK to integrate Novu with your backend codebase.
Multi-tenancy
Manage multiple tenants within an organization.
Localization
Manage localized versions of your notification templates.
Local studio
Use our local studio with Novu Framework to design and test your notification templates.
Environments
Manage multiple environments based on your application’s deployment stages.